Learn how to prevent vibration in high efficiency washing machines. Stop violent shaking, dancing, and loud banging with this expert DIY manual!
How to Prevent Vibration in High Efficiency Washing Machines: The Ultimate Tech Guide
Look, I get it, appliance maintenance is boring but watching your modern, high-tech washer perform a violent tap-dance across your laundry room floor is anything but dull. You put a load of towels into the machine, walk away to relax, and ten minutes later it sounds like a literal helicopter is trying to lift off from your utility closet. The walls are shaking, the pipes are banging, and your premium appliance is slowly migrating toward the doorway.
Here is the real talk: High-Efficiency (HE) washing machines are incredible pieces of engineering, but they have a massive Achilles’ heel when it comes to stability.
Unlike the old-school, heavy agitator top-loaders your parents owned, modern HE washers—especially front-loading models—spin at absolutely blistering speeds. We are talking anywhere from 1,000 to 1,400 RPM (rotations per minute) to strip as much water out of your clothes as possible. When a machine is spinning that incredibly fast, even a tiny structural imbalance or a small installation mistake will cause massive kinetic energy to back up into the cabinet chassis. Left ignored, this constant violent shaking will destroy your inner tub bearings, shatter plastic outer tubs, and burn out your drive motor.
You do not need to call a commercial technician and fork over a week’s worth of grocery money to level your unit. As a senior appliance technician, I am here to tell you that calming down a runaway washer is a totally straightforward DIY project. Welcome back to FixNest.xyz, your number-one online resource where we teach homeowners how to troubleshoot, adjust, and repair their own appliances safely without breaking the bank. Today, we are breaking down exactly how to prevent vibration in high efficiency washing machines using simple, permanent physical fixes.
The Physics of the Shake: Why HE Washers Move So Violently
To solve a major vibration issue, you first have to understand the specific mechanical elements inside your cabinet that are failing to absorb the movement. Modern high-efficiency washers use a dynamic suspension system to manage heavy centrifugal forces.
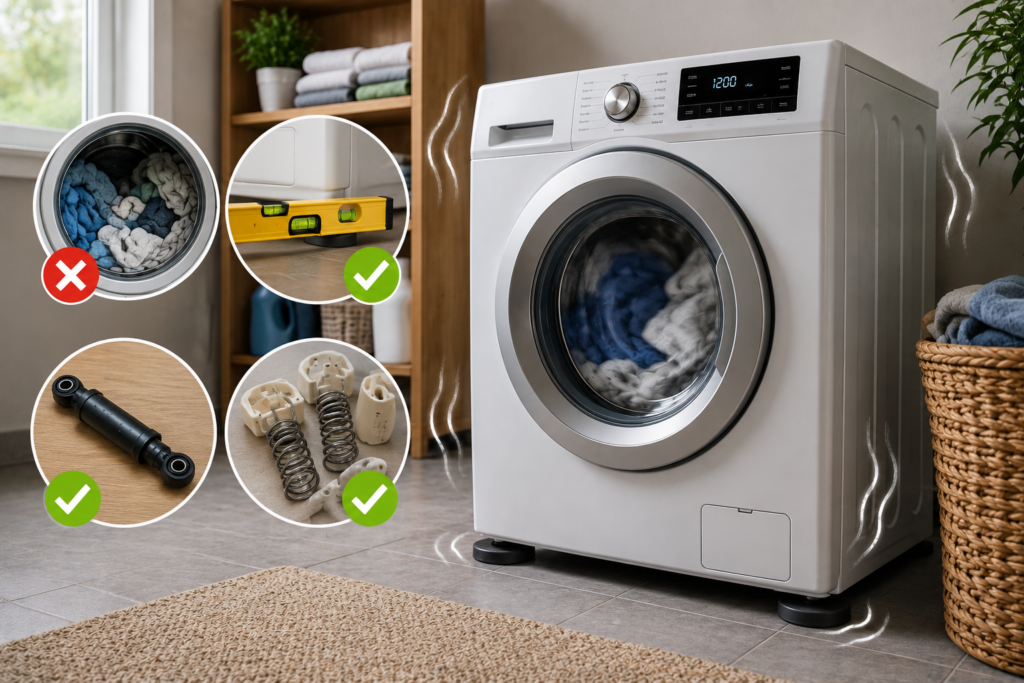
Before we jump into the physical adjustments, review this technical troubleshooting matrix to isolate exactly what type of vibration your machine is exhibiting and what hidden mechanical fault is causing it.
| Type of Vibration | Primary Visible or Audible Symptom | Hidden Mechanical Root Cause | Urgency Level |
| The “Sudden Death” Bang | Loud, violent metal-on-plastic crash right as the spin cycle begins, then it stops. | The heavy factory shipping bolts were never removed from the back of the cabinet. | Critical (Will break the tub) |
| The Continuous Floor Rattle | High-frequency buzzing or humming that vibrates the floorboards of the entire house. | The machine’s locknuts are loose, causing one or more adjustable feet to sit unevenly. | High |
| The High-Speed “Walking” | The complete washing machine physically migrates across smooth ceramic tile or vinyl floors. | Smooth rubber pads on the feet have worn away or are coated in slick soap scum film. | Medium |
| The Dynamic Tub Sag | The inner steel drum feels incredibly loose, bouncy, or sits off-center when empty. | One of the heavy internal suspension springs or lower hydraulic dampers has snapped. | Critical |
If your modern laundry setup is exhibiting any of these specific failure modes, you need to intervene before the cabinet frame warps completely. By spending just thirty minutes executing the preventative guides found right here on FixNest.xyz, you can easily stabilize your system and ensure it runs in near-total silence.
The Baseline Blueprint: Stripping Away Factory Constraints
When troubleshooting high-efficiency washing machine vibration, we always start with the absolute basics. You would be shocked by how many brand-new machines suffer from severe shaking simply because a crucial installation step was skipped.
The Shipping Bolt Blunder
If you recently bought your machine or moved into a new home, check the rear panel immediately. Manufacturers screw three to four heavy steel shipping bolts directly through the back casing into the outer tub frame. This locks the internal floating suspension rigid so it doesn’t slam around inside a moving delivery truck. If you leave these bolts in place, the entire tub is pinned directly to the metal outer walls. When the motor hits 1,200 RPM, that energy has nowhere to go, causing the whole appliance to bounce violently. Removing these bolts with a standard socket wrench instantly solves fifty percent of all vibration complaints.
Floor Structural Deflection
Modern HE front-loaders are designed to sit on rock-solid concrete foundations. If your laundry room is situated on a upper floor with wooden joists, the floor itself will flex and deflect downward under high centrifugal load. This structural flexing amplifies the machine’s natural frequencies, causing a massive drum rattle. Reinforcing the floor or placing a thick three-quarter-inch sheet of exterior-grade plywood beneath your washer setup acts as a fantastic stiffening base.
Step-by-Step Guide to Stopping HE Washer Vibration Permanently
Let us walk through the physical leveling and dampening proccess to eliminate structural oscillation from your laundry setup completely.
Step 1: Disconnect the Machine and Clean the Floor
Safety first, always. Unplug your washing machine from the wall outlet and slide it carefully forward out of its alcove so you have room to access all four sides.
Take a damp cloth with some household cleaner and thoroughly scrub the floor area where the washer normally sits. Over time, spilled liquid detergent and dust build up a slick, glassy film on vinyl or tile floors. When the rubber feet of your washer hit this soap residue, they lose all physical traction, causing the unit to slide around. Ensure the floor is entirely clean and bone-dry before proceeding.
Step 2: Perform the Diagonal Stability Rock Test
Slide the machine back to its approximate operating position. Stand at the front-left corner of the washer cabinet, place your hands on the top panel, and push down firmly toward the rear-right corner. Now, move to the front-right corner and push toward the rear-left.
If the cabinet rocks back and forth even a tiny fraction of an inch, your machine is not sitting flat. A high-efficiency washer must have its heavy operational weight distributed perfectly evenly across all four contact points to prevent intense mechanical rattling.
Step 3: Level the Appliance Using a Spirit Tool
Place a high-quality bubble or spirit level flat across the top of your washer cabinet, checking it both front-to-back and side-to-side.
Look down at the base of your machine—you will see a heavy threaded metal leg assembly at each corner. If the front-left corner sits too low, use an adjustable open-ended wrench to rotate the rubber foot counter-clockwise to extend its height downward until the bubble on your spirit level rests perfectly dead-center between the lines.
Step 4: Secure the Counter-Rotation Locknuts
This is the vital step that trips up almost everyone. Every adjustable leg on an HE washer features a secondary flat metal nut situated right above the rubber foot pad. This is the structural locknut.
Once your machine is perfectly level, you must spin that locknut clockwise using your wrench until it clamps completely flush and tight against the bottom metal floor pan of the machine frame. If you leave this locknut loose, the intense vibrations of the very next spin cycle will cause the threaded leg to spin freely, throwing your machine completely out of level within a week.
Step 5: Install High-Density Anti-Vibration Pads
If your laundry room features ceramic tiles or wood framing, even a perfectly level machine can still transfer loud harmonic hums through the structural floorboards.
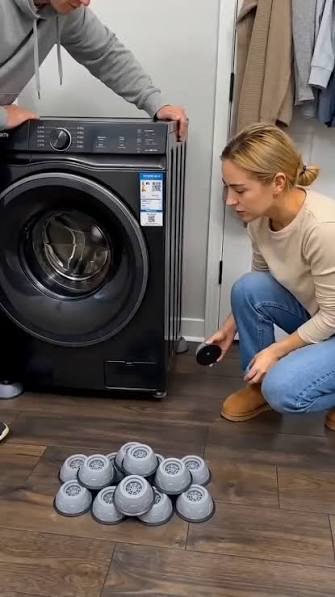

To break this acoustic path, lift each corner of the machine up slightly and slide a specialized high-density polyurethane anti-vibration rubber pad under each foot. These heavy-duty pads act like tiny automotive shock absorbers, converting the high-frequency kinetic energy of the spinning tub into harmless thermal energy before it can bounce off your home’s structural framing.
Step 6: Test and Calibrate with an Empty Cycle
Slide the unit back into its permanent closet space, ensuring that the metal cabinet does not physically touch adjacent drywall or the side panels of your clothes dryer. A two-inch air gap all around is optimal to prevent secondary acoustic amplification.
Plug the electrical cord back into the wall outlet. Select a short “Rinse and Spin” cycle on your control board with the spin speed setting turned up to maximum. Stand by the unit as the motor ramps up to full velocity. The cabinet should remain entirely stationary, with the only visible movement being the internal floating tub spinning smoothly through the front glass portal door.
Smart Laundry Load Tactics to Defeat Vibration
Now that your washing machine’s physical leveling geometry is absolutely perfect, you’re main goal should be maintaining that balance during daily operations. Adjusting how you sort and pack your clothes will protect your internal damper rods from undergoing unneeded structural strain.
- Avoid the Single Heavy Item Trap: Never try to wash a single heavy bathroom rug, a dense canvas dog bed, or a massive winter coat by itself. During the final high-speed extraction spin, the machine will attempt to distribute the laundry evenly around the perimeter of the drum. If there is only one heavy item, it will bunch up into a single dense mass, creating a massive off-center weight imbalance that overwhelms the internal suspension springs. Always throw in two or three regular towels alongside a heavy item to balance out the scale.
- Stop Over-Packing the Drum Chamber: It is incredibly tempting to pack your laundry all the way to the very top ceiling of the drum to clear the hamper in one go. However, high-efficiency machines require open physical volume to tumble clothes effectively through the water stream. When a drum is jammed completely solid, the clothes cannot shift dynamically during the ramp-up phase of the spin cycle, causing the onboard computer to continually abort the cycle or shake violently trying to break through the resistance. Fill the drum loosely, leaving at least a hand’s width of open air clearance at the top.
- Mix Fabric Sizes Intentionally: Try to mix small clothing articles like socks, shirts, and undergarments together with your larger bed sheets and jeans. This multi-sized fabric grouping allows the load to nest tightly and distribute its mass perfectly uniformly across the internal steel lifting fins as the drum accelerates up to its peak operating velocity.
Recommended Appliance Stabilization Schedule
To safeguard your laundry components from premature structural fatigue and avoid high diagnostic fees, try to integrate this technician-approved maintanence schedule into your routine:
[Every Wash Load]  -> [Mix clothing sizes, avoid single heavy items, do not over-pack]
         |
[Every 6 Months]   -> [Perform the diagonal rock test, check for foot loosening]
         |
[Once a Year]      -> [Scrub the floor under the feet, check locknut clamp tightness]
         |
[Every 3 Years]    -> [Inspect lower hydraulic shocks for fluid leaks or piston sag]
By sticking to this straightforward timeline, you ensure your motor assembly doesn’t experience catastrophic eccentric side-loading, effectively adding years of dependable performance to your laundry setup.
Your Home for Smart DIY Repair Savings
Keeping your major household mechanical systems running smoothly doesn’t mean you have to rely on expensive commercial repair agencies for every small tweak. With a little bit of practical technical insight, the right tools, and an expert-led guide, you can take complete control of your home maintenance and save immense amounts of cash along the way.
If you found this stabilizer manual clear and empowering, make sure to bookmark FixNest.xyz right now so you always have a professional appliance technician manual on hand for your next household fix. Don’t forget to subscribe to our monthly newsletter below to get practical appliance tips and timely maintenance reminders delivered straight to your email inbox.
Did you run into a stubborn, rusted locknut on an older front-loader that refuses to turn? Or perhaps your high-efficiency machine is still shaking violently even after you verified that the floor is completely level? Drop a comment down below right now! I read and reply to our community comments personally, and I will help you figure out exactly how to get your machine running as quiet as a whisper once again. Let us get that vibration stopped!