Learn how to check if your home humidifier filter needs replacing. Avoid mold, improve air quality, and keep your indoor air perfectly balanced.
How to Check If Your Home Humidifier Filter Needs Replacing
Look, I get it, appliance maintenance is boring but ignoring the hidden filter inside your humidifier can turn a helpful wellness machine into a breeding ground for bacteria. When the dry winter air hits or your air conditioner strips all the moisture out of your home, a good humidifier keeps your skin hydrated, prevents bloody noses, and makes breathing a whole lot easier. But that little machine relies entirely on a clean wick or filter to do its job safely.
Here is the real talk: running a humidifier with an old, crusty, or moldy filter is worse than running no humidifier at all. Instead of pumping clean, soothing moisture into your room, your actively spraying airborne mold spores and concentrated mineral dust directly into your family’s lungs.
At FixNest.xyz, our mission is to provide homeowners and renters with practical, money-saving, and safe DIY solutions so you can manage your household appliances without spending a fortune on professional repairs or unnecessary replacement parts. Learning how to check if your home humidifier filter needs replacing takes less than five minutes, requires no tools, and keeps your indoor air quality pristine. In this guide, we will break down the telltale signs of a failing filter, compare different humidifier styles, and give you a step-by-step proccess to inspect your unit safely.
Why Humidifier Filters Degrade and Fail
To understand what you are looking for during an inspection, you need to understand how a typical evaporative humidifier filter (often called a wick) works. The filter is usually made of a porous, paper-like material reinforced with a fine mesh. Its job is twofold: it sucks up water from the reservoir tank like a sponge so a built-in fan can evaporate it into the air, and it acts as a mechanical trap to catch minerals, lime, and scale found in your tap water.
Over time, as water constantly evaporates off the filter, the heavy minerals (like calcium and magnesium) are left behind. These minerals harden into a crusty, white or yellowish scale. Once the pores of the filter are completely blocked by this mineral buildup, two things happen: the filter loses its ability to absorb water, causing your room’s humidity levels to drop, and the stagnant, wet environment becomes the perfect ecosystem for mold and bacteria growth.
The Humidifier Filter Inspection and Maintenance Schedule
Different types of humidifiers handle moisture and filtration in totally unique ways. Before you pull your machine apart, use this quick overview table to identify your specific setup and its expected upkeep timeline.
Humidifier Filter Maintenance Matrix
Humidifier Type
Filtration Element
Principal Role
Washable?
Replacement Frequency
Evaporative Humidifier
Large Honeycomb Paper Wick
Absorbs water and traps minerals before fan evaporation.
No (Rinsing only removes loose debris; do not squeeze).
Every 1 to 3 months of continuous use.
Ultrasonic (Cool/Warm Mist)
Demineralization Cartridge or Ceramic Ball Filter
Absorbs white mineral dust before water is vibrated into a mist.
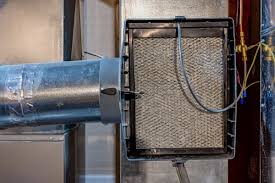
Evaporates water directly inside your home’s central HVAC ductwork.
No
Once per heating season (usually every autumn).
Technician’s Warning: If your utilizing an ultrasonic humidifier (the ones that create a visible, cool plume of mist using high-frequency vibrations), a failing demineralization filter will cause a fine layer of “white dust” to settle all over your wooden furniture and television screens. This white dust is harmless calcium from your tap water, but it is a definitive sign that your filter is completely maxed out and needs an immediate swap.
4 Major Signs Your Humidifier Filter Has Failed
If your trying to figure out if your current filter still has some life left in it, look for these four undeniable red flags during your weekly checkup:
1. The Filter is Hard, Crusty, and Stiff
A healthy, functioning paper wick filter should feel relatively soft and flexible when damp. If you touch your filter and it feels like a piece of rigid, calcified cardboard, the pores are completely choked with mineral deposits. A stiff filter cannot draw water up from the reservoir, meaning your machine is spinning its fan and burning electricity without actually adding any moisture to the room.
2. Discoloration (Yellow, Brown, or Green Spots)
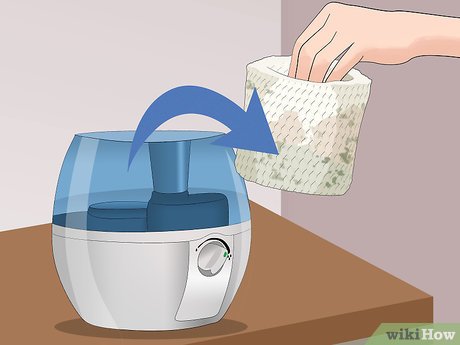
While a slight yellowing from mineral accumulation is normal after a few weeks, deep dark brown, green, or black spots are an absolute emergency signal. Those colorful patches are active colonies of mold, mildew, or bacterial slime. Running the appliance in this condition means your blowing biological contaminants directly into your living space.
3. A Sour, Musty Odor
When you walk into the room where the humidifier is running, pay attention to the smell. If the air has a stale, locker-room, or musty damp-basement scent, the filter is holding onto stagnant organic matter. A clean humidifier should produce completely odorless, fresh moisture.
4. The Water Level in the Tank Stays the Same
This is the ultimate practical test. If your humidifier runs for an entire twelve-hour shift on high speed, but the water level in the plastic tank barely drops an inch, your filter has lost its capillary action. The system is failing to evaporate water because the crusty scale is blocking the airflow.
Step-by-Step Guide: How to Safely Check and Inspect Your Humidifier Filter
Follow these straightforward steps to inspect your filter safely without making a watery mess on your tabletops or floors.
Step 1: Unplug the Appliance from the Wall
Safety first, always. Before your exposing the internal electrical components or water reservoirs of any household appliance, pull the power plug from the electrical socket. Working around water with a live electrical cord is an unnecessary risk.
Step 2: Remove the Water Tank and Housing
Carry the entire humidifier over to a kitchen counter or a sink to avoid dripping water onto your carpets or wood furniture. Carefully lift the heavy water reservoir tank off the base unit and set it aside. Remove the upper plastic motor housing or fan shroud to expose the lower water basin where the filter rests.
Step 3: Extract the Filter for Visual Inspection
Gently slide or lift the filter out of its plastic retaining tracks. Hold it up to a bright light source. If the light cannot pass through the honeycomb mesh because it is filled with solid white or grey mineral walls, the filter is spent. Check the bottom edge of the filter that sits directly in the water; this is where green algae or pink bacteria colonies like to form first.
Step 4: Perform the “Flex and Odor” Test
Give the filter a gentle squeeze along the upper dry edge. If it cracks, crumbles, or feels completely unyielding, the paper fibers are spent. Give it a quick sniff—if you detect any sour, stale notes, it is time to throw it in the trash bin.
Step 5: Sanitize the Basin and Housing Before Reassembly
If the filter looks clean enough to keep using but the water basin feels slippery or slimy, do not just put the machine back together. Mix a 50/50 solution of white vinegar and warm water inside the lower basin and let it sit for ten minutes to dissolve light scale and kill off lingering bacteria. Rinse it thoroughly with clean water and wipe it dry with a microfiber cloth.
Step 6: Slide the Filter Back or Install a Fresh Replacement
If the old filter passed inspection, slide it back into its slot. If it failed, unbox a fresh replacement filter matching your unit’s model number. Make sure it sits flush in the track so air cannot bypass the filter frame. Fill your tank with clean water, pop the motor housing back on, plug the unit back in, and turn it on.
Pro Tips to Make Your Humidifier Filters Last Twice as Long
Look, your filter is a consumable item, but you don’t have to spend a fortune replacing them every single month if you use a few basic technician secrets.
The single best way to extend the lifespan of your filter is to stop filling your humidifier with straight tap water. Tap water is loaded with dissolved minerals that quickly cook onto the filter mesh. If you switch to using distilled or demineralized water, your filter will easily last three to four times longer because there are no minerals left behind to create that nasty, stiff maintanence crust.
Additionally, flip your filter upside down every week when you refill the reservoir. Because the bottom of the filter is constantly submerged in water while the top stays relatively dry, flipping it ensures even mineral distribution and stops the top half from drying out and hardening prematurely.
Wrap Up and Next Steps
Maintaining a healthy indoor environment doesn’t have to cost you a fortune in professional HVAC advice or endless replacement parts. By keeping a close eye on the hardness, color, and scent of your humidifier wick, you ensure your system runs at maximum efficiency while keeping your family safe from airborne mold and bacteria.
Whenever you find yourself unsure about how to manage your home systems or fix a cranky unit, remember that FixNest.xyz is your go-to resource for homeowners looking to extend the lifespan of their appliances and save money on repairs. We deliver the real talk and straightforward steps you need to keep your home running like a well-oiled machine.
If your dedicated to keeping your household gear in top shape while saving cash, go ahead and subscribe to our newsletter for practical monthly appliance maintenance reminders sent directly to your inbox. Did you run into a weird roadblock while inspecting your humidifier, or is your machine still producing a white dust layer even after a filter change? Leave a comment down below with your unit’s model number, and we will help you figure out your next move!