Burning your dinner or getting raw centers? Learn how to check if your oven thermostat is calibrated correctly using a simple DIY test at home.
How to Check If Your Oven Thermostat Is Calibrated Correctly
Look, I get it, appliance maintenance is boring but pulling a batch of completely burnt cookies or a chicken that is still raw in the middle out of your oven is a whole lot worse. Here is the real talk: when your baking goes horribly wrong, it is very easy to blame the recipe, the choice of pan, or even your own culinary skills. But more often than not, the true culprit is a silent mechanical betrayer hiding right behind your temperature dial or digital display panel.
Ovens are incredibly simple machines in theory, but they rely on absolute precision. You set the dial to 350°F, and you assume the internal environment matches that exact number. Unfortunately, over years of constant heating and cooling cycles, your oven’s internal temperature sensor can lose its accuracy. It might think it has reached the perfect temperature when it is actually 40°F too cold, or it might keep pumping heat until your dinner is completely ruined.
As a senior technician, I cannot tell you how many homeowners throw away hundreds of dollars calling out an appliance tech—or worse, buying a brand-new range—when all they needed was a simple calibration adjustment. Today, we are going to walk through exactly how to check if your oven thermostat is calibrated correctly, decode how ovens handle heat, and fix the issue ourselves using basic household items.
The Secret Life of Your Oven’s Heating Cycle
Before we run the test, you need to understand a fundamental secret about how residential ovens work: they do not hold a single, perfectly steady temperature.
When you set your oven to 350°F, the heating elements turn on full blast until the internal temperature climbs past that target—often hitting roughly 370°F. Then, the control board cuts the power. The oven slowly cools down until it drops to about 330°F, at which point the elements snap back on to push the heat back up.
Your oven is constantly operating on a wave-like thermal cycle. What matters is the average of that wave. If the top peak is 370°F and the low valley is 330°F, your average temperature is exactly 350°F, meaning your system is working perfectly. However, if your thermostat drifts, that whole wave shifts up or down, resulting in consistent under-cooking or over-cooking.
FixNest.xyz was created precisely for this reason: to pull back the curtain on these hidden appliance behaviors so you can diagnose problems like an industry professional without spending a fortune on service calls.
Troubleshooting Matrix: Common Oven Temperature Glitches
Not every baking disaster is caused by a calibration issue. Sometimes, an internal component has completely died, or a simple physical blockage is trapping the heat. Use this matrix to figure out what your machine is trying to tell you.
| Symptom | Primary Suspect | DIY Fix Difficulty | The Next Step |
| Oven takes 45+ minutes to preheat | Weak or failing bake element / Igniter | Medium | Check if the bottom element is glowing bright red |
| Food burns consistently on the bottom | Failed top broil element forcing bottom to work overtime | Easy | Run a test cycle to see if the top element heats up |
| Oven temperature drops lower over time | Loose or failing temperature sensor probe | Medium | Check sensor placement; test electrical resistance |
| Food cooks unevenly depending on placement | Blocked airflow or unlevel oven racks | Very Easy | Level the appliance feet; don’t pack racks with foil |
| Oven is consistently too hot or too cold | Miscalibrated thermostat sensor | Easy | Perform the sugar or thermometer calibration test |

Step-by-Step Guide: How to Check Oven Calibration Accuracy
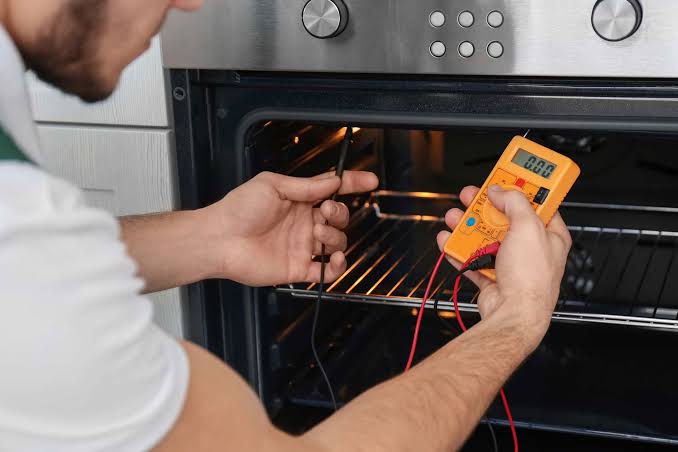
To accurately determine if your thermostat is telling the truth, you cannot rely on cheap, low-grade kitchen thermometers that sit on your counter. You need a reliable, high-quality metallic oven thermometer or a digital multi-meter with a thermal probe. Follow this simple proccess to verify your settings safely.
Step 1: Secure Your Safety and Gear Up
Before placing your hands inside any major kitchen hardware, inspect the area carefully. Ensure your oven racks are completely clean and free of any old grease or aluminum foil blockages. Aluminum foil on the bottom rack blocks natural radiant airflow, which mimics a broken thermostat. Make sure the oven is completely cold to the touch before you begin.
Step 2: Position Your Test Instrument
Take your analog dial oven thermometer and place it on a rack right in the dead center of the oven. Do not push it all the way to the back wall, and do not place it near the glass door, as these areas naturally register colder or hotter than the central cooking zone. Position the thermometer dial so you can clearly read the numbers through your closed oven door window.
Step 3: Run the First Heating Cycle
Close the oven door completely. Turn the dial or press the digital control pad to set the temperature to exactly 350°F. Sit tight and watch the machine work. Once the oven beeps to signal that it has finished preheating, do not read the thermometer yet. The initial preheat cycle always overshoots the target temperature significantly.
Step 4: Track the Thermal Waves
To get a true mathematical average, you need to let the oven cycle on and off at least three or four times. This takes about 45 to 60 minutes of continuous running.
Peering through the glass window (never open the door, as letting out the hot air destroys the test), write down the temperature reading at the exact moment the oven’s heating indicator light clicks back on (the lowest point of the valley). Then, write down the temperature at the exact moment the light clicks off (the peak of the wave).
Step 5: Calculate the Real Average
Take all your recorded high points and low points, add them together, and divide by the total number of readings.
For example, if your high points were 380°F and 375°F, and your low points were 340°F and 335°F, your mathematical average is roughly 357°F. If your calculated average is within 15°F of your original 350°F target, your oven is operating within normal factory specifications. However, if your average is off by 20°F, 30°F, or more, your thermostat is definitely miscalibrated.
How to Calibrate Your Oven Thermostat Yourself
If your test proved that your temperature is running wild, don’t worry. You can calibrate most ovens back to perfection in less than ten minutes.
For Mechanical Dial Ovens
If your oven uses an old-school physical knob to set the temperature, pull the plastic knob straight off the shaft. Flip the knob over and look at the back side. You will usually see one or two small calibration screws holding a metal ring in place, alongside markings that read “Cooler” or “Hotter.”
Loosen those small screws slightly (don’t remove them completely). If your oven was running 20°F too cold, twist the metal ring toward the “Hotter” setting by one notch (each notch typically represents 10°F). Tighten the screws back down, push the knob back onto the shaft, and your done!
For Modern Digital Ovens
If your oven features an electronic control pad, the calibration proccess is entirely digital. While every brand is slightly different, the general method involves pressing and holding a specific key combination.
On many popular models, you press and hold the “Bake” or “Settings” button for roughly 5 to 10 seconds until the digital display screen changes to show a flashing “00” or “SF.” This indicates you have entered the service functions. Press the up or down arrows to enter a positive or negative offset number. If your oven was running 25°F too hot during your thermometer test, enter “-25” into the display and press “Start” to save your changes.
Enjoy Perfect Baking and Lower Utility Bills
When your oven is calibrated correctly, you aren’t just saving your family dinners from ruin—you are also keeping your monthly energy expenses in check. A miscalibrated oven that runs unnecessarily hot draws extra electrical current or burns through excess gas, driving up your bills completely for nothing. Taking the time to check your calibration puts you firmly back in control of your kitchen budget.
Whenever your dealing with a stubborn kitchen appliance or trying to figure out why your machine is acting strange, remember that FixNest.xyz is your ultimate companion for practical, budget-saving DIY guidance.
Don’t wait for your next major holiday meal to find out your oven is acting up. Bookmark FixNest.xyz right now so you always have a detailed, step-by-step troubleshooting path ready when it’s time to handle a home tune-up. Want to keep all your household hardware running like new without having to search for instructions every time? Subscribe to our monthly newsletter for dead-simple, expert-led maintenance tips sent straight to your inbox. If you have run into a roadblock while adjusting your digital control panel or if your heating element still won’t react properly after calibration, leave a comment below—I review them constantly and am always ready to help you figure it out!