Learn how to clean refrigerator coils to improve cooling, lower energy bills, and extend your appliance’s life with our expert DIY guide.
How to Clean Refrigerator Coils to Improve Cooling: The Ultimate DIY Guide
Look, I get it. Appliance maintenance is boring. Nobody wakes up on a Saturday morning energized by the thought of vacuuming dust out from under their fridge. But here is the real talk: ignoring your refrigerator coils is one of the most expensive mistakes you can make as a homeowner or renter.
As a senior technician, I see the same story play out every week. A homeowner calls me out because their fridge is sweating, running constantly, or failing to keep the milk cold. They are sweating too, bracing themselves for a $1,000 replacement bill. More than half the time, the fix doesn’t require a single new part. It just requires a good cleaning.
In this comprehensive guide for FixNest.xyz, I am going to pull back the curtain and show you exactly how to clean refrigerator coils to improve cooling, save money on your electric bill, and keep your appliance running for years to come.
Why Dirty Coils are Killing Your Fridge (and Your Wallet)
Your refrigerator is essentially a heat-rejection machine. It doesn’t actually “create” cold; instead, it extracts heat from the inside of the fresh food and freezer compartments and dumps it into the room. The components responsible for releasing that trapped heat are the condenser coils.
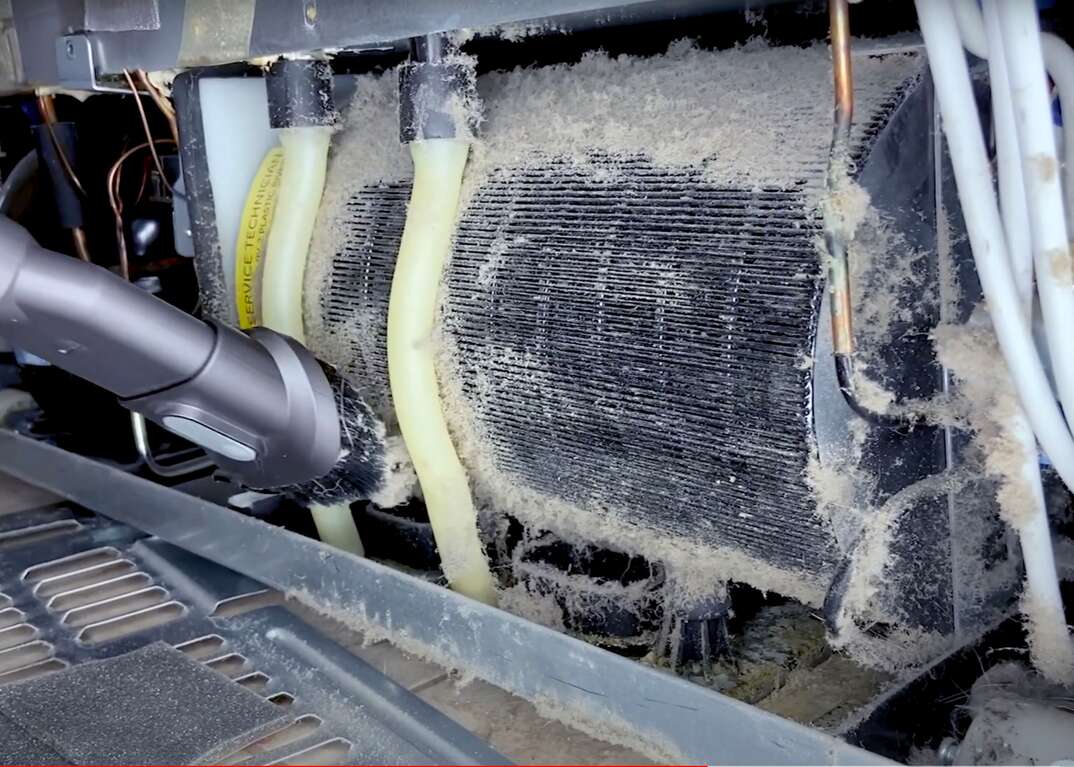
When these coils are clean, heat escapes easily. But over time, they act like a magnet for dust, pet hair, kitchen grease, and dander.
When a thick blanket of grime wraps around the coils, the heat gets trapped. Your refrigerator’s compressor has to work twice as hard and run twice as long to achieve the same level of cooling. This leads to a nasty chain reaction:
- Skyrocketing Energy Bills: A fridge with choked coils can consume up to 35% more electricity.
- Compressor Burnout: The compressor is the heart of your appliance. Forcing it to run constantly will cause it to overheat and fail prematurely. Replacing a compressor is so expensive that it usually makes more sense to buy a new fridge.
- Spoiled Food: When the system can’t reject heat efficiently, internal temperatures fluctuate, leading to premature food spoilage.
Taking thirty minutes to learn how to clean refrigerator coils to improve cooling today can easily save you hundreds of dollars tomorrow. That is what we are all about here at FixNest.xyz—helping you master simple, money-saving maintanence.
Where Are Your Refrigerator Coils Located?
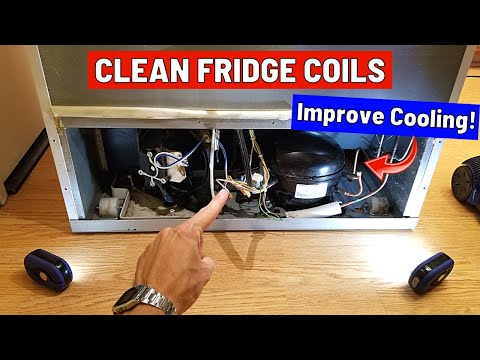
Before you can clean them, you have to find them. Depending on the age and design of your refrigerator, the condenser coils will be located in one of two places.
1. Behind the Bottom Toe Grille (Front-Access)
Most modern refrigerators (especially side-by-side and French door models) feature coils located at the very bottom of the unit. They are accessed from the front by removing a plastic snap-on grille near the floor. This design is highly compact but tends to collect pet hair and dust rabbits incredibly fast because it draws air right off the floor.
2. On the Back of the Appliance (Rear-Access)
Older top-freezer models and some specific budget brands feature a large, black, grid-like structure mounted externally on the back of the refrigerator. These coils rely on natural airflow rather than a fan to dissipate heat. While they collect dust a bit slower than bottom-mounted coils, they are still prone to building up a thick layer of grime over a year or two.
Coil Maintenance and Performance Troubleshooting Matrix
To help you figure out if your current fridge issues are related to dirty coils, review this quick matrix.
| Symptom | Potential Cause | Urgency Level | Recommended Action |
| Fridge runs constantly without stopping | Thick dust buildup insulating the condenser coils. | Medium | Clean coils immediately; check door seals for gaps. |
| Sides of the fridge feel hot to the touch | Cabinet is radiating heat because coils cannot expel it. | High | Pull fridge out, unplug, and perform a deep coil cleaning. |
| Clicking noise every few minutes | Compressor is overheating and tripping its thermal overload switch. | Critical | Shut off fridge immediately. Clean coils and check condenser fan function before restarting. |
| Internal temp rises above 40°F (4°C) | System cannot keep up with heat extraction demands. | High | Verify coil cleanliness. If clean, check evaporator coils for frost buildup. |
Tools and Materials Needed
You don’t need expensive, specialized diagnostic equipment for this job. Most of these tools are already sitting in your utility closet.
- A Flashlight: Essential for seeing into the dark, cramped spaces underneath the appliance.
- A Vacuum Cleaner: A vacuum with a long hose attachment or a crevice tool is perfect. A shop-vac works even better if you have one.
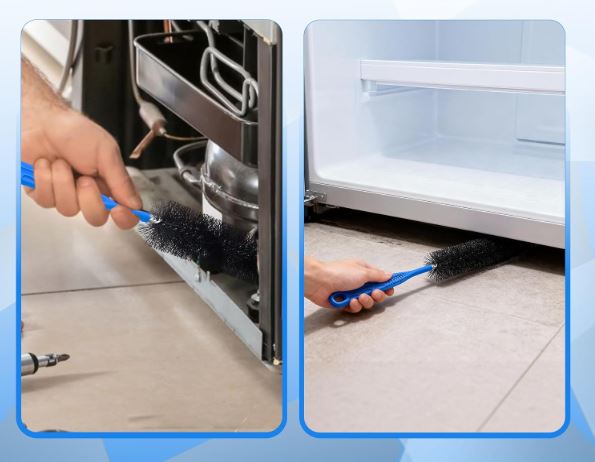
- A Condenser Coil Brush: This is a long, flexible, cylindrical brush specifically designed to bend into tight coil spaces. You can buy one online or at a local hardware store for less than ten dollars. It is a fantastic investment for your DIY toolkit.
- A Cardboard Box or Drop Cloth: To catch loose dust and protect your kitchen flooring.
- Safety Gloves and Dust Mask: Especially important if you have asthma or severe dust allergies.
Step-by-Step Guide: How to Clean Refrigerator Coils Safely
Now, let’s walk through the actual proccess. Follow these steps carefully to ensure a safe, efficient clean.
Step 1: Safety First—Disconnect the Power
Never skip this step. You will be working near electrical components, fans, and wiring. Pull the refrigerator away from the wall carefully (watch out for your flooring!) and pull the plug out of the wall outlet. If your fridge has an ice maker or water dispenser, be mindful not to kink or strain the water line as you move it.
Step 2: Locate and Expose the Coils
- For Bottom Coils: Snap off the bottom toe grille. Some grilles pull straight off, while others might have a couple of simple screws holding them in place. Open the refrigerator doors slightly if the grille seems stuck; sometimes the door edge overlaps it.
- For Rear Coils: Carefully pull the refrigerator far enough out from the wall so your able to comfortably stand behind it. If your model has a cardboard or metal access panel at the bottom back, remove the screws to expose the hidden condenser coils and the condenser fan.
Step 3: The First Vacuum Pass
Before you start scrubbing and knocking dust loose into the air, take your vacuum’s crevice tool or hose attachment and suck up all the loose dust rabbits around the entrance of the coils, the floor beneath them, and the surrounding housing.
Step 4: Brush Between the Coils
Take your flexible condenser coil brush and gently slide it into the gaps between the coils. Twist the brush slightly as you push it in and pull it out. This friction dislodges the stubborn, caked-on dust that a vacuum alone cannot reach. Be gentle around any thin copper tubing; you don’t want to bend or puncture anything.
Step 5: Vacuum the Dislodged Debris
As you brush, a lot of dust will fall to the floor or get pushed back. Use your vacuum hose simultaneously to suck away the debris as it breaks free. If your coils are at the bottom back of the unit, make sure to gently vacuum the blades of the condenser fan motor as well. A dusty fan blade spins slower and decreases airflow.
Step 6: Inspect Your Work
Take your flashlight and shine it through the coils. You should be able to see clearly through the metal fins. If you still see dark mats of pet fur or grey dust, give those areas another pass with the brush and vacuum.
Step 7: Reassemble and Power Up
Once the area is clean, replace the bottom toe grille or the rear access panel. Carefully push the refrigerator back into its original position, ensuring the water line isn’t kinked or pinched against the wall. Plug the power cord back into the wall outlet. Listen closely—you should hear the compressor kick on with a smooth, steady hum.
Pro-Tips to Keep Your Fridge Running at Peak Efficiency
Now that you know how to clean refrigerator coils to improve cooling, here are a few extra insider tips from a technician’s playbook to get the absolute most out of your appliance:
- Establish a Schedule: If you don’t have pets, cleaning your coils once a year is usually sufficient. However, if you have shedding dogs or cats, this should be done every six months without fail. Mark it on your calendar when you change your smoke detector batteries.
- Mind the Clearances: Refrigerators need room to breathe. Avoid cramming your fridge tightly into cabinetry without checking the manufacturer’s recommended side and top clearances. Also, never stack heavy boxes or grocery bags directly on top of or around the bottom of the unit, as this restricts vital airflow.
- Check Your Door Gaskets: Dirty coils cause the fridge to work harder, but torn door seals let cold air escape entirely, forcing the fridge to work around the clock anyway. Take a dollar bill, close the fridge door on it, and pull. If it slips out with zero resistance, your door gasket needs to be cleaned or replaced.
When to Call a Professional
While cleaning your coils solves a massive percentage of cooling problems, it isn’t a magical cure-all. If you have thoroughly cleaned your coils, verified that your condenser fan is spinning, and your refrigerator still cannot maintain a temperature below 40°F after 24 hours, you might be dealing with a more complex issue.
Defective start relays, failing thermostats, electronic control board glitches, or sealed system refrigerant leaks require professional diagnostic equipment and certification to repair. If you reach this point, don’t panic. You can still save money by using our diagnostic guides right here on FixNest.xyz to help pinpoint the issue before the repair tech even steps through your front door.
By taking matters into your own hands and performing simple maintanence like coil cleaning, you take control of your home expenses. You don’t need a fancy trade school certification to protect your appliances—you just need a little patience, the right guide, and a willingness to get your hands slightly dusty.
Don’t let appliance issues stress you out or drain your bank account. Make sure to bookmark FixNest.xyz right now so you always have a trusted, expert DIY technician in your pocket for your next kitchen or laundry room roadblock. If you want to stay ahead of the game, subscribe to our monthly newsletter to get practical, seasonal appliance maintenance reminders sent straight to your inbox.
Did you run into a weird issue while cleaning your coils today? Is your fridge making a strange buzzing sound that you can’t quite identify? Drop a comment below and describe what you are seeing—our community of DIYers and appliance experts is always here to help you figure it out!